Using the default Homebrewery theme is a quick way to a great looking brew, but it’s not uncommon to look for a way to make small or even drastic changes to how things are styled and presented. A neat side-effect of using the Homebrewery to make these kinds of changes is that in order to do so you will likely start learning a new skill: web development. The Homebrewery is basically just a website editor, taking your content and outputting an HTML + CSS website and displaying it. As such, you should look to some common tools in the developer’s toolkit—tools like the browser’s Inspect Tool.
What is it?
To get the ball rolling right out of the gate, the Inspect Tool can be found in two common ways: Right clicking on any part of a webpage to open a context menu and choosing “Inspect”, or by hitting F12 which will open the browser Developer Tools and looking along the toolbar for the Inspect Tool (![]() ) and then clicking on any page element.
) and then clicking on any page element.
In either case, you are going to be shown the browser’s dev tools panel, and by using the Inspect Tool it will (likely) show you 3 panes: The HTML structure of the site including your brew, the CSS rules applied, and a 3rd panel which may show one of a few options. Specifically, after using the Inspect Tool, these panels will show you results related to the item you just clicked on.
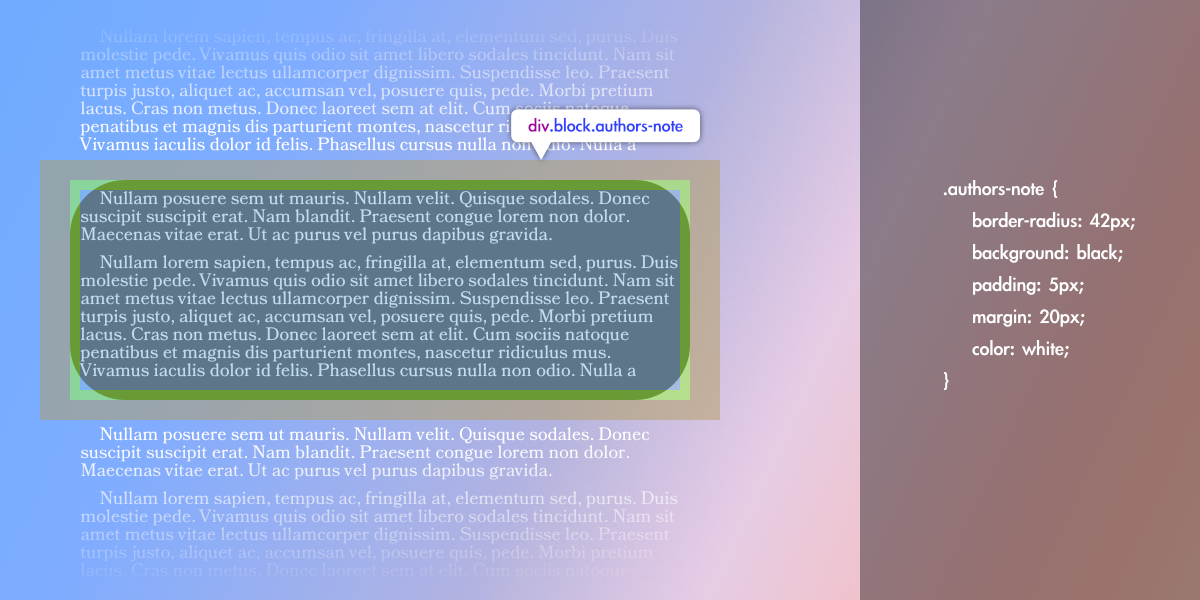
Here, I have inspected a header element on a brew:

In the first pane you can see the h2 header highlighted. I can easily see that the header element has an id="tabbing-text" which is just the slugified version of the actual text. I could also quickly see if there are any CSS class names applied here or some sort of inline styling.
- slugified:
- a human readable form of the last part of a URL; in this case, just a version of the text with spaces and special characters removed.
The second pane currently shows the Styles tab, which provides a look at the CSS styles applied to this specific element including the selectors, properties and values. More on this later.
The third pane, in Chrome, is actually a sub-panel of the second– Changing the tabs along the top in the Styles row will change how this is presented (or hide it completely). This is a little different from Firefox but is similar enough. The panel just shows more details of the second, generally.
Why is it useful?
Every time you are making changes to the style of your page or elements you are using CSS which relies on accurate selectors to target those elements (and while multiple selectors may work, usually there is a “good selector” and a “bad selector”). Sometimes it can be hard to know which selector is going to work for a particular element—this is particularly true in the Homebrewery where there is an existing and complex CSS stylesheet in place which you frequently need to override.
Using the Inspect Tool will help keep you from merely guessing what your selectors need to be. It will also allow you to double check your custom CSS is working as you expect and also test changes quickly right in the second panel.
A look at the Developer Tools
Let’s say I want to change the position of the page numbers on each page, but it’s not entirely clear to me how to do that. First, which selector do I use? I might first try just targeting the class by writing the following in the Style Editor:
.pageNumber {
  right: 50px;
}But in the live preview, nothing changes. Seems like it should work since I’m targeting it by the elements class name and I don’t see any other rules applied to it. What gives? Well, let’s open the dev tools (F12) and use the Inspect Tool to click on the page number and see what it is made of.
Things actually get a little tricky here, because as I try to click on the page number element with the Inspect Tool I am only able to click on the footer graphic. This is because the graphic is actually “on top of” the page number. The further panel to the left in the dev tools may look like this after clicking on the footer, with the highlighted line representing the footer graphic element and the pageNumber element before it:
<div class="pages">
  <div class="page" id="p1">
    <div class="columnWrapper">
      <p>
        <span class="inline-block pageNumber auto">1</span>
      </p>
      <span class="inline-block footnote">PART 1 | SECTION NAME</span>
      <p></p>
      <div class="columnSplit"></div>
      <p></p>
    </div>
    ::after
  </div>
</div>Ideally I wouldn’t have to hunt in the HTML like this, but I’m using this example so it is addressed in case you see the same thing. I can expand the collapsed elements to find that pageNumber element and then click on it—doing so will open that element in the Styles panel just to the right (middle panel):

The Styles panel shows the most relevant or “specific” CSS rules at the top. As I scroll down in this panel I will peel back the layers of rules applied to this particular element like an onion. The first rule, the element.style { ... } block is empty, but if I applied an inline style to the pageNumber it would show here. For example, in my brew:
{{pageNumber,auto,color:red }}
{{footnote PART 1 | SECTION NAME}And the result:

color: var(--HB_Color_Footnote)) and replaced above by color: red.Because inline styles always have a higher specificity than other styles, the color property is set to red. Alternatively, I could type my own rules in this element.style { ... } block and those properties/values would be applied to the element as if they were an inline style. Because the browser will auto-complete property names and also offers auto-complete for those property values this is an excellent way to test quick change to my CSS styling. Keep in mind that if I want any changes to actually be applied to my brew I need to transfer that CSS to the brew’s Style Editor—refreshing the page right now will reset any changes I made only in the dev tools.
The next rule below, with the selector .page .pageNumber, is the next-most relevant rule to the particular HTML element I have selected. This makes sense because the element has the .pageNumber class name in it, so the rules for that class are applied. But the next rule below it is .page .inline-block, which similarly is applied because the element has the .inline-block class. So why does the .pageNumber style come first?

When two CSS selectors point to the same element with the same level of specificity, it is the rule that comes later in the CSS stylesheet that overrides the other. In this case, the rule for .page .inline-block comes first in the theme’s stylesheet, and only later is a rule set for .page .pageNumber.
How the Developer Tools Help
Any of the CSS properties listed here are properties that are currently set. If I need one of these properties to be different (or unset), I will need to use a selector that matches or exceeds the specificity shown here. If I want to change the font-size of the page number, this is not enough:
.pageNumber {
  font-size: 1.5em;
}This will not override .page .pageNumber because it is not more specific. You would need to match or exceed:
.page .pageNumber {
  font-size: 1.5em;
}NOTE: This may change shortly after I publish this, as an update to HB is in the works that will automatically increase the specificity of everything in the Style Editor over the rules set in the theme stylesheet using CSS Layers. If this happens, I will make a post about it.
Using the Inspect tool to find the existing theme styles will help tremendously by taking the guess work out of creating your own CSS rules.
What now?
Just getting familiar with the Inspect Tool is going to be a major boon to your brewing and you’ll wonder how you ever did any customizing without it. But this post only covers the most basic part of the overall tools available in the Developer Tools. In that same Styles tab you can also filter by properties or selectors, add class names to elements on the fly, see how elements change when hovered over or clicked, and more. Check out the Computed tab (next tab from Styles) to see how your margins, padding, font-sizes, etc are being determined. Use this as a jumping off point to learning more about web development in general.